Prep room management with waste management & Making Spirit Burners
Tracy Sherwood-Farnfield RSciTech, MSc
Waste management is an issue that comes up frequently on the technician forums with many technicians worrying that they are creating too much waste and not feeling confident dealing with it after practical lessons.
After establishing what our concerns were regarding waste, this workshop then focused on some of the specific waste issues in biology, chemistry and physics and how to approach them, including establishing if there are any local restrictions that technicians need to comply with, what the legal guidelines are, and what is best practice for departments to follow.
Unsurprisingly, chemistry waste took up most of the discussion time, where we looked specifically at procedures to reduce waste and how waste could be reused in other practical applications, to save costs and be environmentally considerate.
For biology we talked about disposing of sharps and dissection materials, where local guidelines can differ, and amounts disposed of will depend on the restrictions imposed by the waste contractors employed by the school. We also looked at the responsibility of safe disposal in microbiology and how we can get the students involved to do some of the hard work for us, using ‘grot-pots’ and trays of Virkon, for example.
In chemistry, we explored microscale versions of popular practical methods, such as electrolysis and reactivity series investigations as a means of reducing the waste requiring specific attention after the lesson. Conversely, we also looked at where we could reuse chemicals and/or recycle them for other practical purposes, such as fully decomposing copper carbonate from thermal decomposition to generate copper oxide that could be used in making copper sulfate crystals.
Physics centred around how the law has changed regarding the disposal of WEEE (waste electrical and electronic equipment) and rare-earth metal waste, batteries in particular, and how schools need to dispose of this waste responsible so that the limited resources can be recycled and put back into the production chain. We also touched on radioactive waste and where to find the relevant information to undertake this, and when it is required.
We concluded by discussing how to select waste contractors and how to engage one for a significant/regular chemical up lift and how to approach this from a budgetary perspective.
The PPT on sched has all the specific practical methods discussed and details of places to find further information.
Making Spirit Burners
2.15-3.15
This was a hands-on ‘make and take’ workshop looking at making 2 items of microscale kit that can easily be made by technicians and easily used by students in smaller scale versions of required practical lessons.
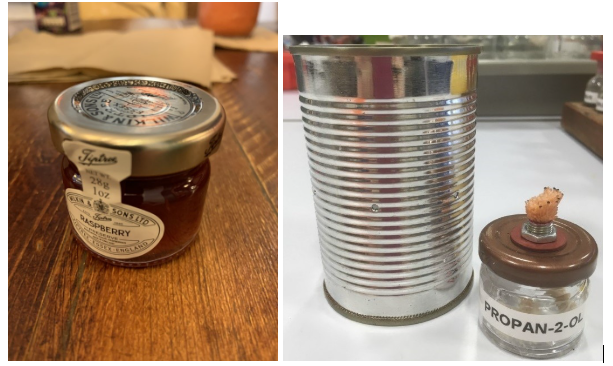
The first was a microscale spirt burner made from a small jam-jar such as the ones you might find in nice cafes served with a cream tea! These little burners are an ideal way to reduce the amount of fuel needed for a class set (and therefore the amount purchased and stored) and are much safer than the larger scale versions especially if they get tipped over. The ones made in this work shop make use of some basic hardware purchased from Amazon, DIY stores or chandelier suppliers, which allow for the use of the standard 50mm diameter wick supplied for spirit burners purchased from scientific suppliers. The magic ingredient is the QMax punch (only about £12 from Amazon) that cuts a beautifully clean hole in the metal lid of the jam-jar.
It is very quick and easy to create a whole set of these little burners so that students can work in pairs/small groups. They have obvious application in investigating the energy content of different fuels but can also be utilised for small scale heating work in labs without gas or with a small number of gas-taps available. If you can persuade a local coffee shop to collect the jars, this is also a cheap way to increase the equipment you have available for classes.
The second ‘make’ was a variation on the CLEAPSS microscale electrolysis kit using a Petri dish and carbon kite rods as the electrodes, widely available from Amazon, kite suppliers and rapid electronics. The main modification being to put the electrodes in at the top of the dish, about 1cm apart so that they more closely resemble the electrodes in a standard beaker set-up. Using this method allows students to investigate solutions that generate chlorine gas (copper chloride or brine for example) as such a small amount of gas is generated (and contained within the lidded dish) that short-term exposure limits will not be exceeded, even if large classes are working in pairs. The progression of the reaction is very easy to observe, and the copper formed when using copper chloride is clearly visible through both sides of the Pteri dish. The students only need a 9V battery to run the investigation and the whole kit fits neatly into a standard takeaway tub for easy storage and ‘grab and go’ use. The kits are easy to clean, requiring a quick rinse and wipe, and if the students put there used dishes in a washing-up bowl of water when they are finished, half the job is done before they are even picked up.
Both takes are a great way to scale down chemical use, reduce issues with storage and allow students to work in pairs or even individually for better engagement in practical work.